Someone registered through a company's admin-invite link and is waiting on you. Approving pushes them straight to the confidentiality agreement — admin access is granted automatically once they sign it.
Set up a new company
Creates the company and a one-time admin-invite link — send that link to whoever should be their first admin. Works the same way for any company, no setup beyond this.
Company created. Send this link to whoever should become their first admin:
Generates a one-time link — send it however you like (text, email, WhatsApp). Whoever opens it and creates an account is linked straight to this company. Only you can generate these links.
An admin invite still goes through the same confidentiality-agreement sign-off before access is granted — same as the first admin of a new company. An employee invite goes straight to their own dashboard, no approval step needed.
Outstanding invites
Not yet used — cancel one if it went to the wrong person or you want to stop it working.
Subscription tier is based on how many employees a company actually has on Client Safety HQ — the count updates itself as people are added or removed, and the tier changes silently with it. This screen is only ever visible to you.
Subscription tiers
Placeholder prices — edit and save whenever you've finalized real numbers. The 100+ tier is left as a custom quote on purpose since support/scale needs vary too much to fix a number.
Saved.
Companies
Mind to Hand Safety Client Safety HQ
Almost there
Your request to be set up as an admin has been received.
A Mind to Hand Safety admin needs to approve your request before you can continue. Once approved, you'll be asked to sign the confidentiality agreement — after that, your dashboard opens automatically. Check back shortly, or ask your Mind to Hand Safety consultant to confirm.
The things a supervisor or worker rep opens on a phone, standing in the yard.
Document register
What exists, what's current, and what's still owed — the same table a COR auditor or WorkSafeBC officer asks for first.
Working alone check-in
Start a session before working alone or in isolation (GWD-HS-14, section 4.21) — you'll get a reminder to check in on the interval below, and you can call for help at any time.
You've flagged that you need help. Your supervisor/admin has been notified — call 9-1-1 first for a life-threatening emergency.
You'll be asked to check in every 120 minutes while the session is active.
Driving somewhere today?
Enter your destination and we'll work out automatically whether this route counts as working alone — local routes don't need check-ins, longer or border-crossing routes do.
Your number is only used for the hands-free check-in reminder call — please pull over before interacting with your phone for anything that isn't hands-free.
Started · last checked in
Compliance checks
Recurring daily, weekly, monthly, or annual checks this company's own documents call for — proposed by the AI assistant from the document register, approved by an admin, then tracked here so nothing required slips behind.
Health & safety board
The company's virtual health & safety board — WorkSafeBC info, how to get first aid, posted documents, and safety postings, all in one place you can check any time.
Company & WorkSafeBC info
First aid
Posted documents
Postings
Orientation submissions
Workers who have completed and signed the new worker orientation.
Worker
Position
Start date
Submitted
Site inspections
Completed monthly site inspections, with open deficiencies carried forward each time.
Date
Carried out by
Deficiencies
Open (Priority A/B)
Submitted
Prohibited material in loads
Every find is recorded, including those handled without incident. One contaminated load is bad luck; the same customer three times is a conversation to have before someone gets hurt. See GWD-HS-27.
Safety data sheets
Every hazardous product on site, and its safety data sheet. Search by product or supplier. This is also the hazardous product inventory required by the WHMIS program (GWD-HS-10).
Work refusals
A worker who refuses unsafe work tells their supervisor — no form for them to fill in first. The supervisor records it here and works the four steps set by OHS Regulation 3.12 through to resolution. Confidential; visible to admins only. See GWD-HS-11.
Monthly safety meetings
WorkSafeBC requires a monthly health & safety meeting, alongside the monthly site inspection and a toolbox talk. Talking points below are pulled automatically from this month's incidents and inspection results — check them, add anything else, and save.
Toolbox talks
WorkSafeBC requires a monthly toolbox talk, alongside the monthly safety meeting and site inspection. Use "Suggest this month's topics" for AI-picked ideas based on recent incidents and new documents, or log one directly.
Fall protection plans
Required any time work is done at 25 ft (7.5 m) or greater. Answer a short set of questions and the tool builds a complete plan you can save, print, and email — including a real rescue plan, and if a manlift or scissor lift is used to get on/off the roof, whether there's written approval for that.
Tailboards
Run every morning before work starts. Covers today's crew and job, any prime contractor site rules, the emergency muster point, and — since torch-on work is hot work — the hot work permit and fire watch.
Incidents & near misses
Reported from any phone by scanning the QR code on the incident reporting procedure (GWD-HS-05) — you'll be asked to sign in first, so only people with an account here can submit. Confidential — visible to admins only. Preliminary investigation is due within 48 hours, full investigation within 30 days; submitting to WorkSafeBC is a separate manual step once the investigation is complete.
Report an incident or near miss
Point a phone camera at this code, or share the link directly. Sign-in required — the person is taken to their account, then straight to the report form.
Reported
Type
Claim type
Location
Status
Preliminary due
Full report due
Lone workers — live status
Everyone currently working alone right now, company-wide. Refreshes automatically. A missed check-in or a help request also emails the alert address set in Company settings, once that's configured.
Worker
Task
Started
Last check-in
Next due
Status
Compliance checks — review queue
The AI reads this company's document register and proposes recurring checks it implies — nothing goes live for workers until you approve it here.
Document access log
Who opened which controlled document, and when — the last 100. Useful for showing an auditor the crew actually had the procedures, and for tracing a document if it turns up somewhere it shouldn't.
When
Who
Document
Health & safety board — manage
Write what appears on the board, and flag which register documents should auto-post there (e.g. a freshly completed WorkSafeBC compliance report).
First aid attendant today
Add a posting
Documents on the board
Return to work
Modified-duty cases for lost-time injuries. Fill in the practitioner letter and Return to Work Report on a phone, send it — a copy goes to the notification email below and to the employee automatically — then the employee prints their copy to bring to the doctor. Once the doctor's response is back, attach it, set up the modified work offer, and collect both signatures right here. Confidential — visible to admins only, plus the employee's own case.
Return to work settings
Where the admin copy of every package is sent, and who signs the practitioner letter as the return-to-work coordinator.
Employee
Status
Injury date
Review date
First aid assessments
The written assessment required under OHS Regulation section 3.16 — an AI-guided interview gathers the details, then the app determines the minimum kit, attendants, facility, and transportation straight from Schedule 3-A. One assessment per workplace, reviewed annually or when something changes.
Location
Date
Workers
Class
Hazard rating
Status
Confidentiality agreements
Everyone who has signed the confidentiality agreement (required before being granted admin-level access to confidential records). Check here before granting a new person that access — see Document register, Confidentiality agreement.
Name
Role
Signed
PPE needs assessments
A site-wide assessment of what personal protective equipment is required, and where — for employees, visitors, clients, contractors, and the public. Each completed assessment generates two documents: a Job Safety Analysis and a PPE Program.
Location
Date
Areas
Status
Position-specific training
Who's required to complete what, based on their assigned position(s) — separate from, and in addition to, New Worker Orientation. See Document register, Position-Specific Training Program to manage positions, modules, and who's assigned what.
Facts used across the app — orientation, the first aid quick reference, and first aid assessments. Editable here instead of asking Mind to Hand Safety to change them.
Employer details
Hazard rating is assigned by WorkSafeBC based on your Classification Unit — it's on your annual assessment/rate letter, in the classification unit description area, not something this app calculates.
Site facts
Shown on worker orientation and the on-site first aid quick reference.
Working alone check-in
Controls the "Working alone check-in" widget every worker sees, and where missed-check-in / "I need help" alerts are emailed and texted.
Enter the phone number in full international format (e.g. +1 for Canada/US) so texts deliver correctly. Real emails require Resend, and real texts require Twilio, to be configured on the platform side — until then, alerts are simply skipped rather than lost or errored, and the live status above still shows in real time.
A driver's destination beyond this distance from your address above (or any route crossing the border) is automatically treated as working alone and requires check-ins; anything closer is treated as a local route and doesn't. Needs a Google Maps API key configured on the platform side — until then, drivers confirm this themselves instead of it being calculated automatically.
Work through each step below. Each one explains what WorkSafeBC is actually looking for before it asks you to answer — use "Ask AI" on any step if you want help thinking through your specific situation. Nothing is saved until you click Save.
Workplace details
A first aid assessment has to be reviewed with the joint health and safety committee (or a worker H&S rep) and re-done whenever conditions at the workplace change. Recording who was consulted and when is what makes this assessment valid, not just a completed worksheet.
Step 1 — Number of workers
Schedule 3-A's tables are keyed off the greatest number of workers present on any one shift at this location — not your total headcount. A busy Saturday shift with extra casual staff counts, even if it's unusual. Use the highest number that realistically happens.
Step 2 — Hazard rating
Every WorkSafeBC classification unit (CU) has a base hazard rating of Low, Moderate, or High. That's your starting point — but it's not automatically the right rating for this location. If the work actually done here isn't typical of your CU (for example, a waste-collection crew doing elevated bucket-truck work or work near live electrical lines), the rating you use for this assessment must be raised to match the real hazards — it can never be set lower than your CU's assigned rating just because this location feels safer.
Check this only for a location where people just do office/admin work with none of the industry's usual hazards — e.g. a head office, not a yard or job site. Everywhere else, work through the classification unit questions below the same way WorkSafeBC's own worksheet does.
This is where extra hazards get brought to light. Think about what's actually different here: are workers in a bucket truck or aerial device at height — and if something happens up there, does anyone on site have the training or equipment to bring them down safely? Is there electrical work, or work near live overhead or underground lines? Confined spaces, excavation, work over water? Any of these can mean the real hazard rating for this location is higher than your CU's base rating, even if the CU as a whole is Low or Moderate.
The hazard rating you use below should not be lower than your original CU's assigned rating — use whichever of the two (original CU or alternative CU) is higher, unless WorkSafeBC guideline G3.16 applies.
Step 3 — Workplace class
"Remote" isn't about how far the location feels — it's specifically about whether a BCEHS ambulance can reach the workplace by road within 30 minutes under normal conditions. A yard 40 minutes from town by highway is not remote. A site an ambulance can't physically drive to at all — down a resource road it can't use, across water, or up a slope with no vehicle access — is. If you're not sure how long BCEHS would actually take, that's worth finding out rather than guessing.
"Less accessible" is separate from remote — it's about whether BCEHS attendants could physically get to the worker once they arrive on site. This is exactly where elevated and electrical work belong: a worker up in a bucket truck or on a temporary platform, or working near live lines, may be reachable by road but not reachable by first aid attendants without special access, rescue equipment, or a trained rescuer. Check every area below that applies — don't skip one just because it seems minor.
If you checked an elevated-work or electrical/confined-space item here, go back to Step 2 and confirm your hazard rating still reflects it — this is often where a Moderate-rated CU should really be treated as High for this location.
Additional first aid factors
These factors don't have their own line in Schedule 3-A's tables, but WorkSafeBC expects you to weigh them anyway — they can be the reason you provide more than the bare table minimum, or the reason you document why you didn't need to. If a worker up a bucket truck would need specialized rescue equipment to get down, or your crew handles injuries the wider industry doesn't typically see, this is where that gets recorded.
What's actually provided today
Everything so far has established what Schedule 3-A requires. This step is about what's actually on site right now — kits, attendants, a first aid room, transportation arrangements — so the review step can show you plainly where you already meet the requirement and where there's a gap to close.
Calculate minimum requirements
This looks up Schedule 3-A using exactly what you entered above — number of workers, hazard rating, and workplace class. It never guesses; it's the same table WorkSafeBC itself uses.
A site-wide look at what personal protective equipment is actually needed here, and why — not a generic checklist. Work through each step; nothing is saved until you click Save.
Assessment details
Like any other assessment here, this should be done with input from the joint health and safety committee or a worker health and safety representative, and reviewed again whenever the site or the work changes.
Who is present on this site
This isn't a WorkSafeBC category — it's here so the PPE program that gets generated actually addresses everyone who sets foot on site, not just employees.
Vehicle and mobile equipment traffic
If people share space with trucks, forklifts, loaders, or other mobile equipment anywhere on site, high-visibility apparel is likely required in that area — and the class of apparel required depends on how fast that traffic moves (CSA Z96-15).
Areas and hazards
Break the site into the areas or tasks that actually differ from each other (e.g. "truck yard", "transfer station floor", "front office") and record the real hazards in each one. This is what makes the PPE required specific to this workplace instead of a generic list — and it's what lets you explain to a worker exactly why they need what they're being asked to wear.
Head — falling/flying objects or low clearances ·
Eye/face — flying particles, splash, or welding flash ·
Hand/arm — cuts, chemicals, or thermal contact ·
Foot — impact, puncture, crush, or slip ·
High-visibility — shared space with vehicles/mobile equipment ·
Hearing — loud equipment or machinery ·
Buoyancy — work near or over water ·
Flame-resistant — flash fire or arc flash risk
Chemical exposure or oxygen-deficient atmosphere
This one question matters more than it looks. Under OHSR §8.5, a written PPE program is only a hard legal requirement when there's exposure to a hazardous chemical atmosphere or an oxygen-deficient atmosphere (the kind of situation that calls for respirators). Everything else in this tool is best-practice documentation — this is the one flag that creates an actual separate legal requirement, on top of this assessment.
If you check this box, a qualified person needs to complete a full written respirator program (hazard assessment, respirator selection, fit testing, medical evaluation) under OHSR §8.5–8.45 — this assessment flags that requirement, it does not replace it.
Determine PPE required
This looks up the hazards you checked in each area against WorkSafeBC's own PPE sections — it never guesses.
Takes about a minute. Goes straight to your employer's safety team — kept confidential, and not sent to WorkSafeBC automatically.
If someone is hurt or in danger, or this needs help right now
Call 911 and tell your supervisor immediately. This form is not monitored in real time — it creates a record for the investigation, it does not summon help.
✓
Reported
Thanks — this has been logged. Your safety representative will follow up.
Complete this on your first day. Sign at the bottom once your supervisor has walked the site with you.
Site facts — read before you sign
Fill in and confirm with your supervisor before starting work. A blank here is a gap in the orientation.
Worker details
The yard walk
Do this in person before going further. Your supervisor walks this route with you on your first day and points out the muster point, the first aid station, fire extinguishers, spill kits, the emergency fuel shutoff, marked pedestrian routes, and the areas you do not enter on foot while equipment is running. Do not confirm section 3 below until you have actually stood in each of these areas.
Task instruction and demonstration record
Telling someone about a task is not training — the Regulation requires instruction and demonstration of each specific task, and the employer must keep the record (OHSR 3.23(2)(j), 3.25).
Understanding check
Ask these out loud and write down what the worker actually says. Ticking boxes proves attendance — this proves understanding. If an answer is wrong, go back over that section before signing.
Declaration
Worker signature
Draw with your finger or mouse
Trainer / supervisor sign-off
Draw with your finger or mouse
✓
Submitted
Saved to this company's record and timestamped. The office notification email is next on the list to wire up.
New Worker Orientation stays the universal day-one basics for everyone. This is the separate, position-specific training layer on top of it — set up once per company, so it works the same way for any client.
Positions
Every job at this company — a worker can hold more than one.
Training modules
The actual training content — what someone reads, then signs off on. Attach a required-training checklist to a position below once a module exists.
Content sections
What each position requires
Pick a position, check which training modules apply to it.
Who holds which position
Pick a worker from the roster, check which position(s) they hold — this is what generates their required-training list.
Safe work procedures (SWPs)
Mark any register document as an SWP that positions can be required to review. Most SWPs use a simple "I have reviewed this" sign-off — flag a specific one to require a full training module instead, once you've built one for it.
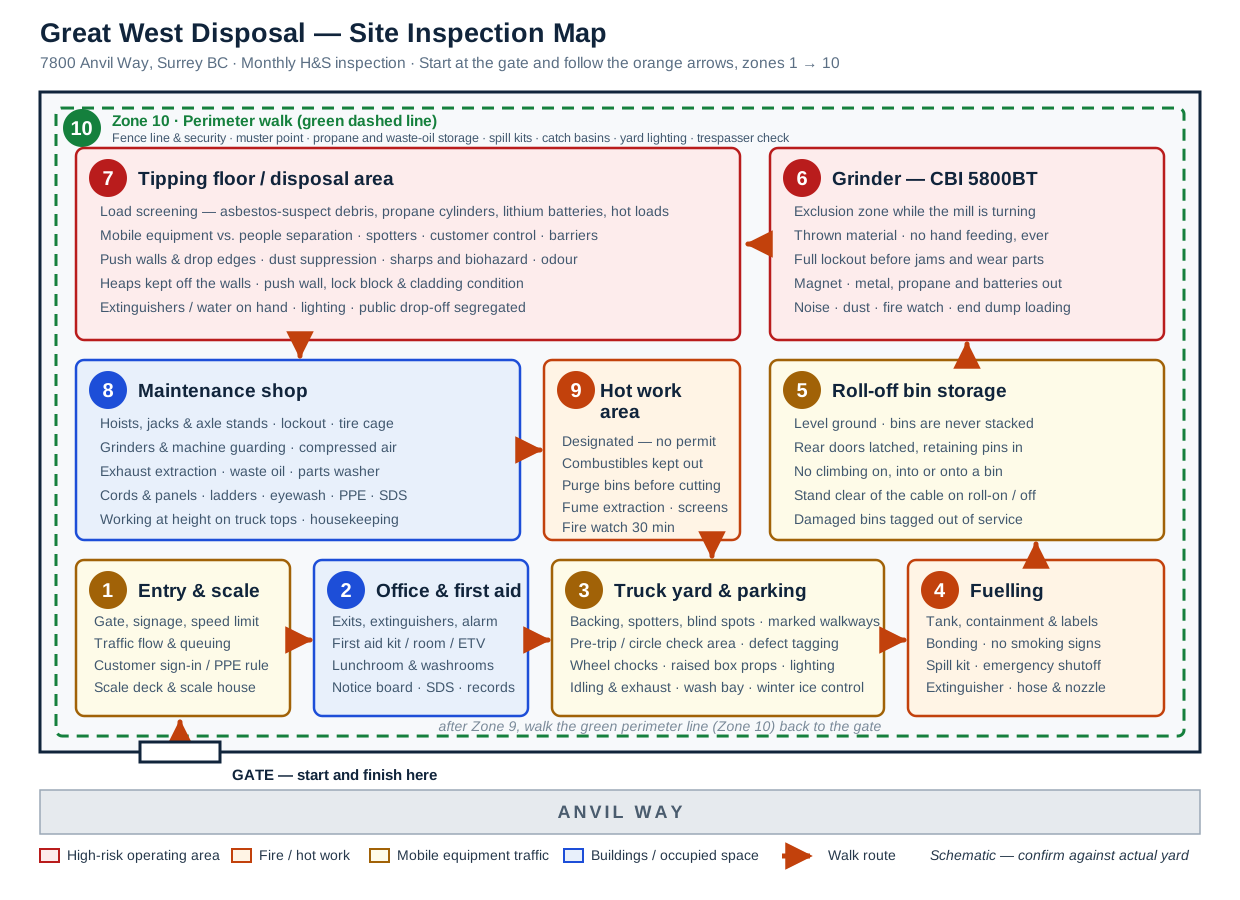
Walk the yard in zone order, 1 to 10. Tick OK, NO or N/A for every line — a NO opens up fields for the deficiency, priority and a photo.
Inspection details
How to use this form
Walk the yard in zone order, 1 to 10 — start and finish at the gate. Tick OK, NO or N/A for every line; a NO records a deficiency below with its location, priority and a photo. Anything Priority A must be dealt with before you leave that zone — tell the supervisor on the spot, do not wait for the report. Talk to at least two workers while you walk and record what they say. Sign at the back, give a copy to the employer, and post a copy on the notice board.
Workers spoken to during this inspection
Talk to at least two workers while you walk. Ask what has nearly gone wrong since last month.
Worker H&S representative sign-off
Signing as the person who carried out this inspection, named above.
Draw with your finger or mouse
Employer / manager sign-off
Draw with your finger or mouse
Sign-off dates
✓
Submitted
Saved to this company's record. Any open Priority A/B items will carry forward to next month's inspection automatically.
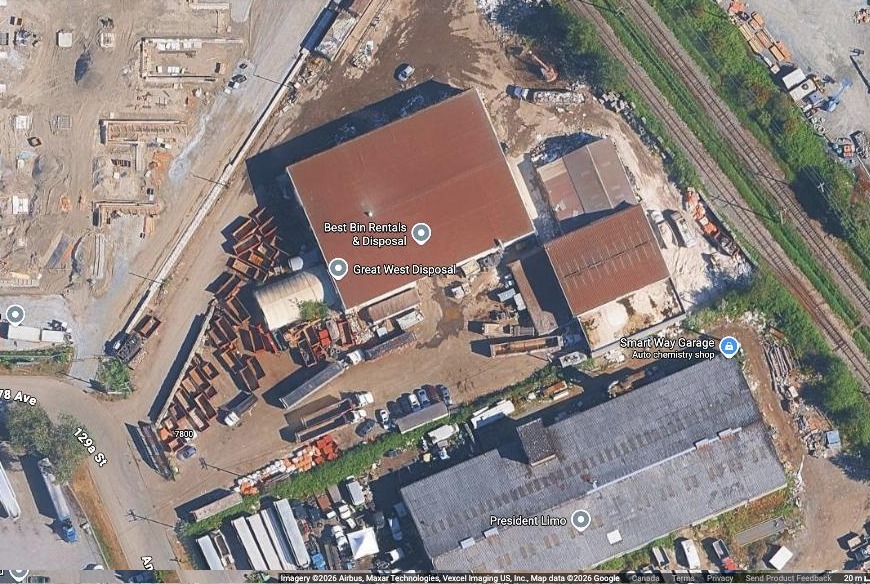
Real satellite photo of the yard at 7800 Anvil Way, Surrey BC — this is the actual site, not a schematic, so pins placed here mark real spots you can walk to.
Click anywhere on the photo to drop a pin — first aid room, scale, muster point, extinguishers, spill kits, fuel shutoff. Click an existing pin to rename, move it, or remove it.
Before first use: walk the site with the yard supervisor once and use "Add / edit landmarks" above to pin the muster point, first aid station, fuel shutoff, spill kits and extinguisher locations directly on this photo. Once placed, this page doubles as the orientation map for new staff and for emergency responders.
Zone diagram (for inspections)
Schematic reference showing the ten numbered zones used by the monthly site inspection and the walk route from the gate — not a photo, but the map to follow section-by-section during an inspection.
How to call for first aid, and what happens next — from GWD-HS-38 (First aid program & procedure). Open this on a phone during an actual response.
How to call for first aid
In the yard or office
Notify the nearest First Aider directly, or use the radio:
From a vehicle or off-site job
Call the office, contact your supervisor or dispatcher by phone, or use radio if equipped.
Life-threatening injury? Call 9-1-1 immediately, then notify a First Aider and supervisor.
Decision flow — first aid, medical aid, lost time
The First Aid Attendant has sole authority over treatment and the decision below, until care is transferred to a medical facility, ambulance, or someone with equal or higher first aid certification.
Add landmark
Upload document
Current file on record: view. Choose a new file above to replace it, or leave blank to just update the details below.
AI investigation assistant
Chats about this incident only, and never invents facts. Nothing is saved until you insert a draft into the form and click Save yourself.